- Introduction
- Back panel
- Front panel
- Function buttons
- Knobs
- External controllers
- Meet Poly
- Few other words
- Firmware updates
- Warranty
- Endnote
- Appendix
- Download
Introduction
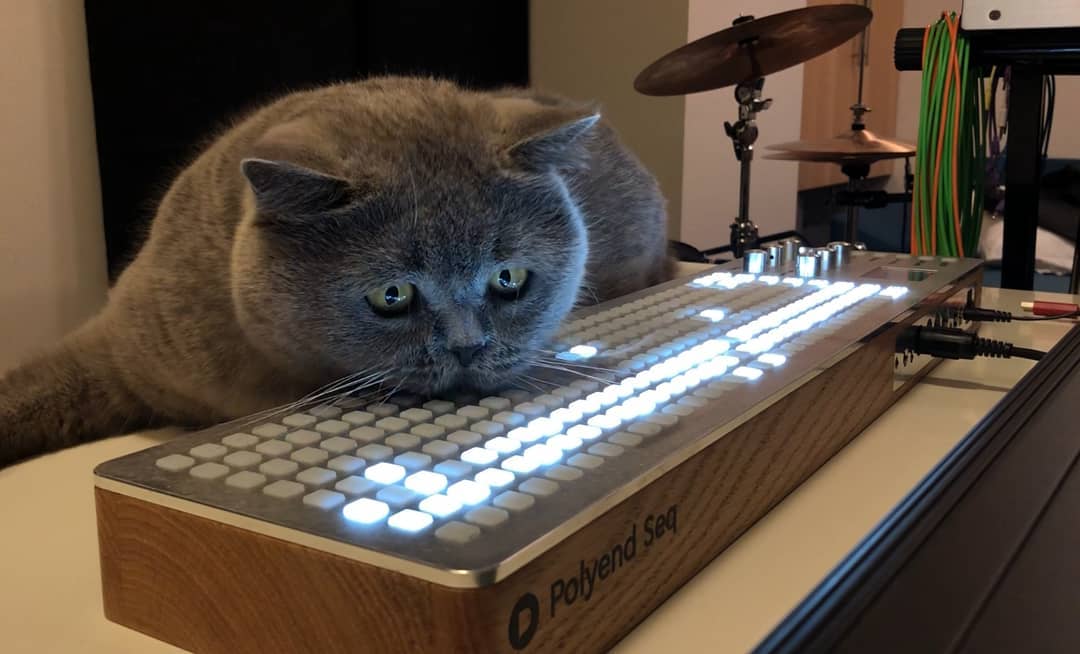
The Polyend Seq is a polyphonic MIDI step sequencer designed for spontaneous performance and instant creativity. It was made to be as simple and fun as possible for its users. Most functions are available instantly from the main front panel. There are no hidden menus, and all functions on the bright and sharp TFT screen and are immediately accessible. Seq’s elegant and minimal design is meant to be welcoming, easy to use, and put all of its a creative potential right at your fingertips.
Touch-screens have become ubiquitous in modern times but they often leave much to be desired. We have strived to make our fully tactile interface easy to operate while using both hardware and software-based setups. Our goal was to make a dedicated music instrument rather than a general-purpose composition computer. We’ve created this tool to allow its users to get lost in it while still maintaining overall control at the same time. After spending some time with this instrument, its users should be able to use it with eyes closed.
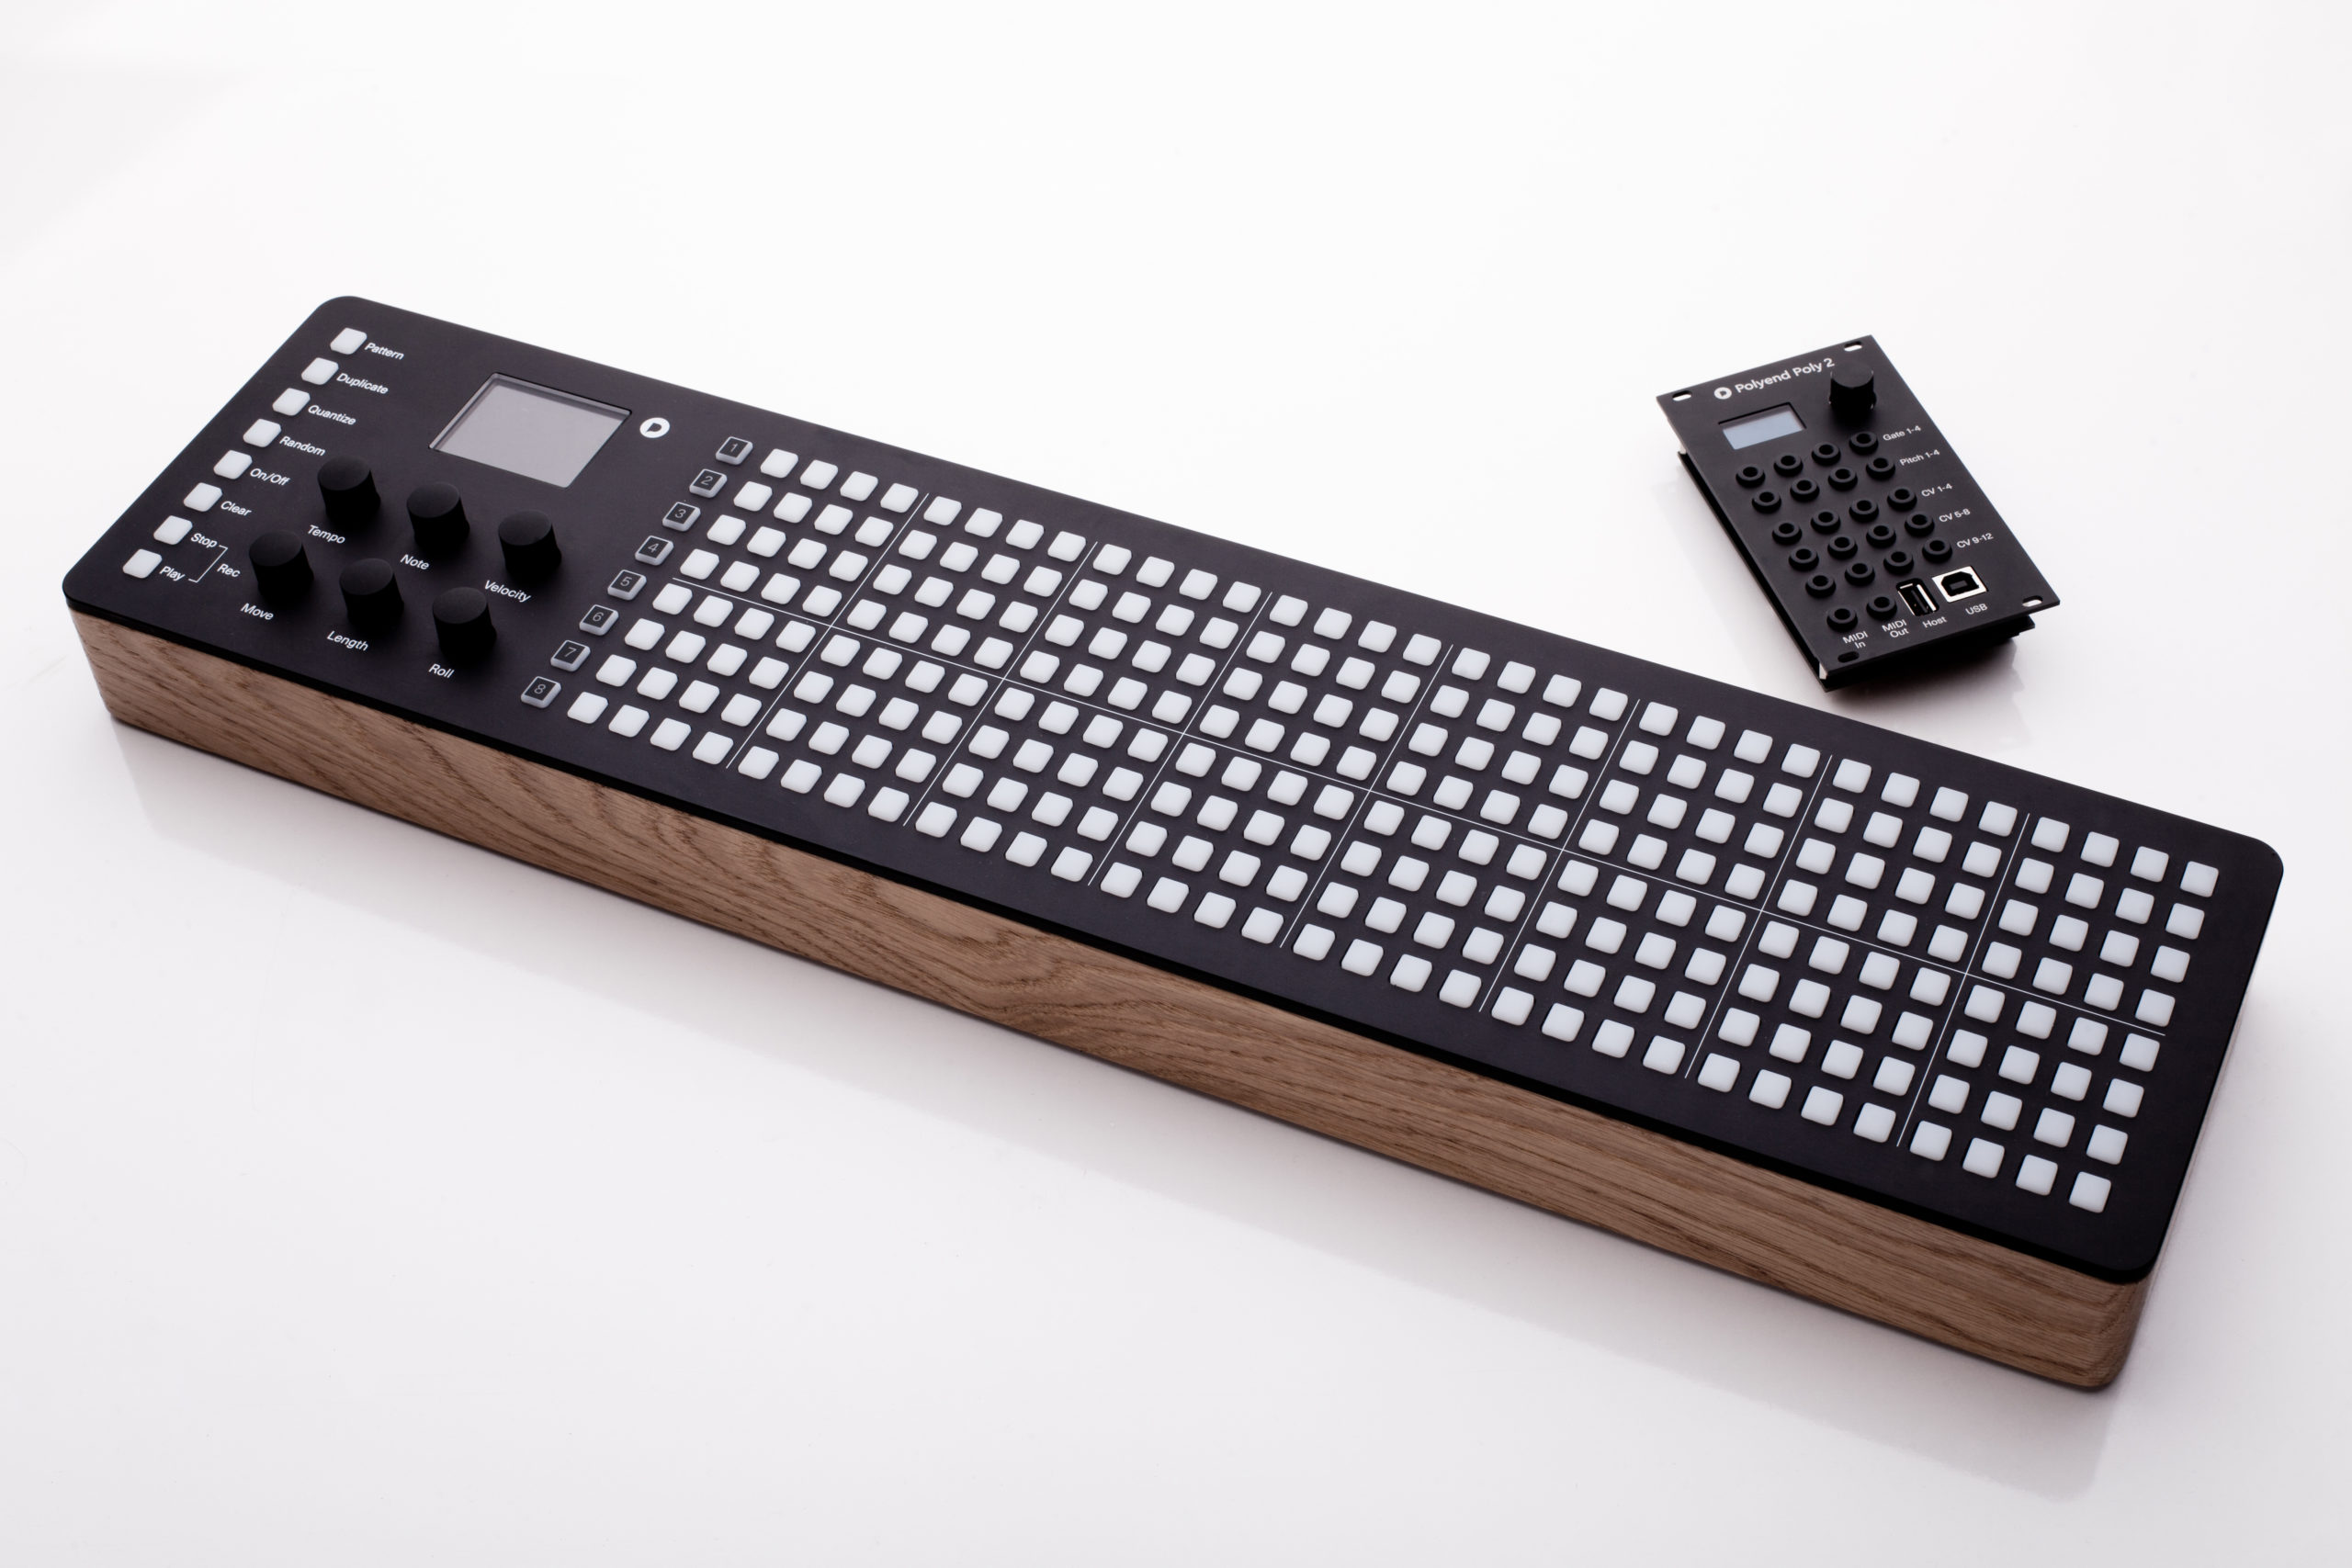
Sit down, relax, take a deep breath, and smile. Open the box carefully and examine your unit thoroughly. What you see is what you get! The Seq is a classic desktop unit. It’s the glass-sanded anodized aluminium front panel, knobs, bottom plates, and handcrafted oak wooden case make Seq rock solid. These materials are of timeless quality and allowed us to avoid the need for any flashy details, leaving only elegance and simplicity.
The buttons are made of silicone with specially matched density and firmness. Their rounded shape, size, and arrangement were chosen carefully to provide an instant and explicit response. It may take up more room on a desk than a laptop or tablet, but the way its intuitive interface is designed is really rewarding.
Use the provided power adapter or USB cable to turn the Seq on. Start by simply connecting Seq to other instruments, computer, tablet, modular system, mobile apps, etc. using one of its inputs and outputs located on the back panel and get started.
Back panel
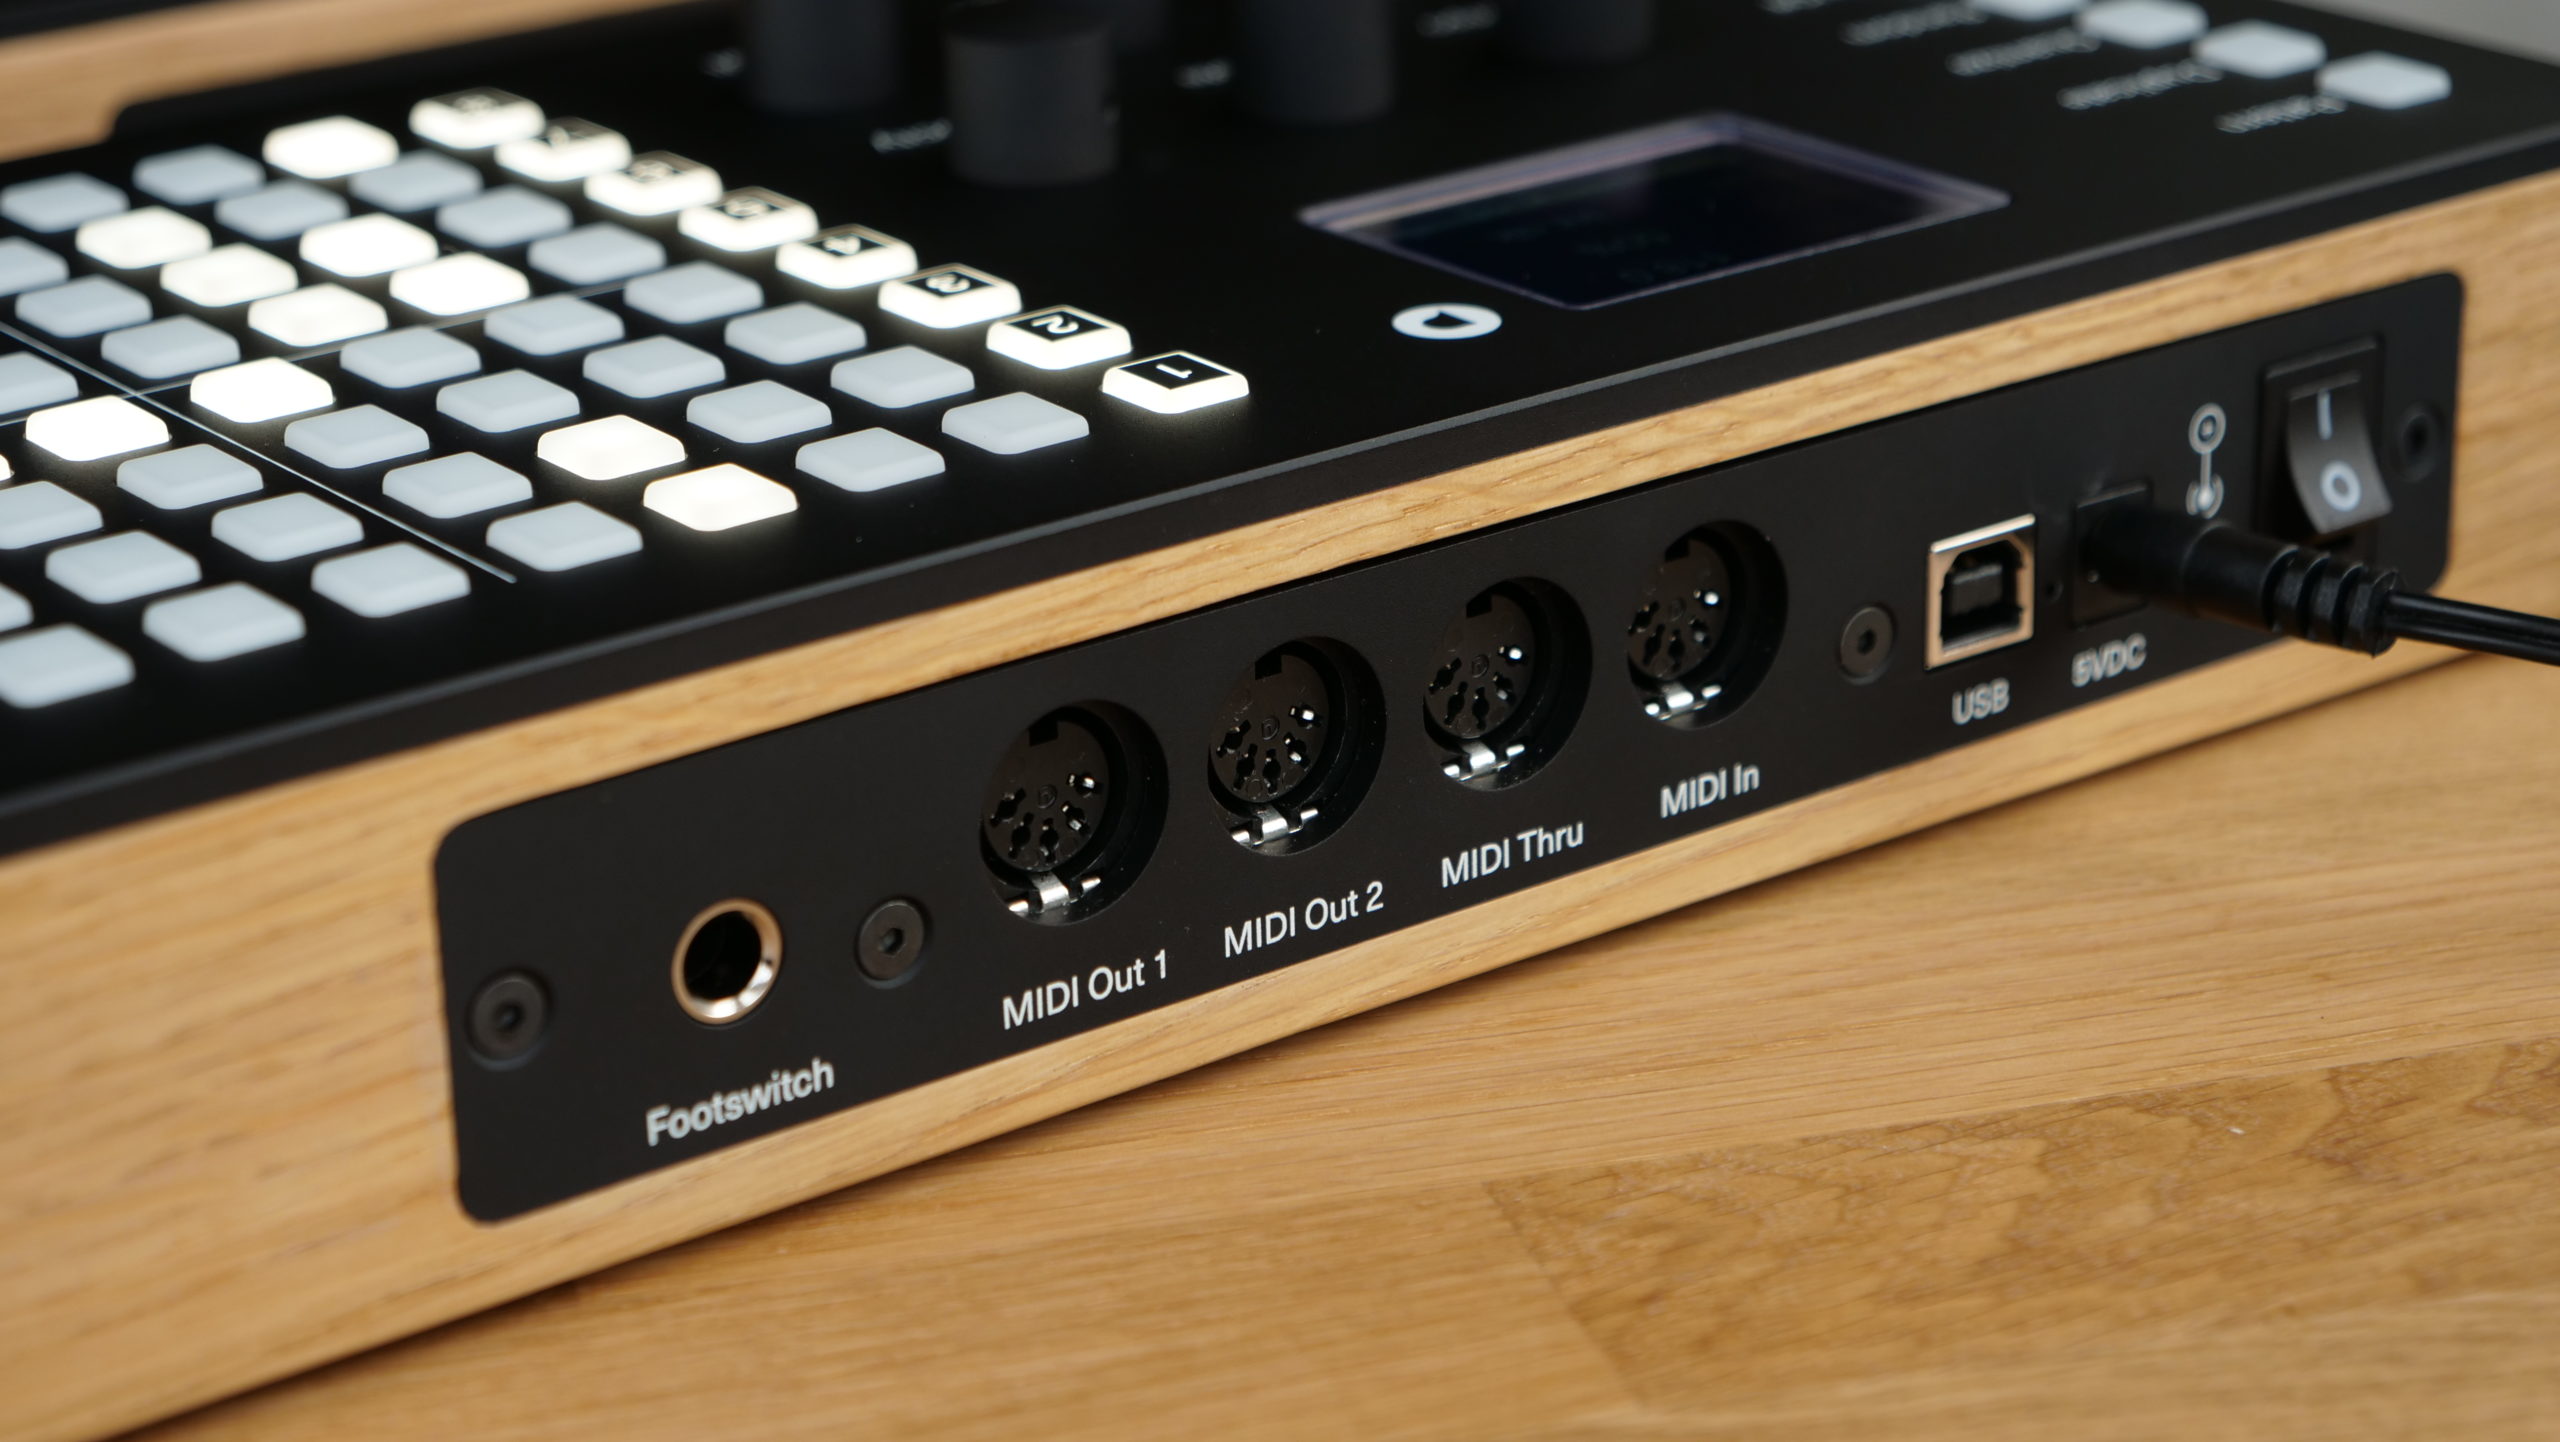
The Seq is equipped with a wide array of inputs and outputs. This allows communication with a wide variety of devices. The Seq also allows feeding tracks with MIDI notes using MIDI controllers. While looking at the back panel, from left to right, find:
- A Foot-switch pedal socket for 6.35mm (1/4” jack) which operates as follows:
- Single press: Starts and stops playback.
- Double press: Starts recording.
- Two independent standard MIDI DIN 5 output female connector sockets, named MIDI OUT 1 & MIDI OUT 2.
- One standard MIDI DIN 5 thru female connector socket named MIDI Thru.
- One standard MIDI DIN 5 input female connector socket named MIDI In which can either sync clock and input MIDI notes and velocity.
- One USB type B socket port for bidirectional MIDI communication for hardware hosts like computers, tablets, various USB to MIDI converters or for example our Polyend Poly MIDI to CVConverter which also can host Seq into the Eurorack modular systems.
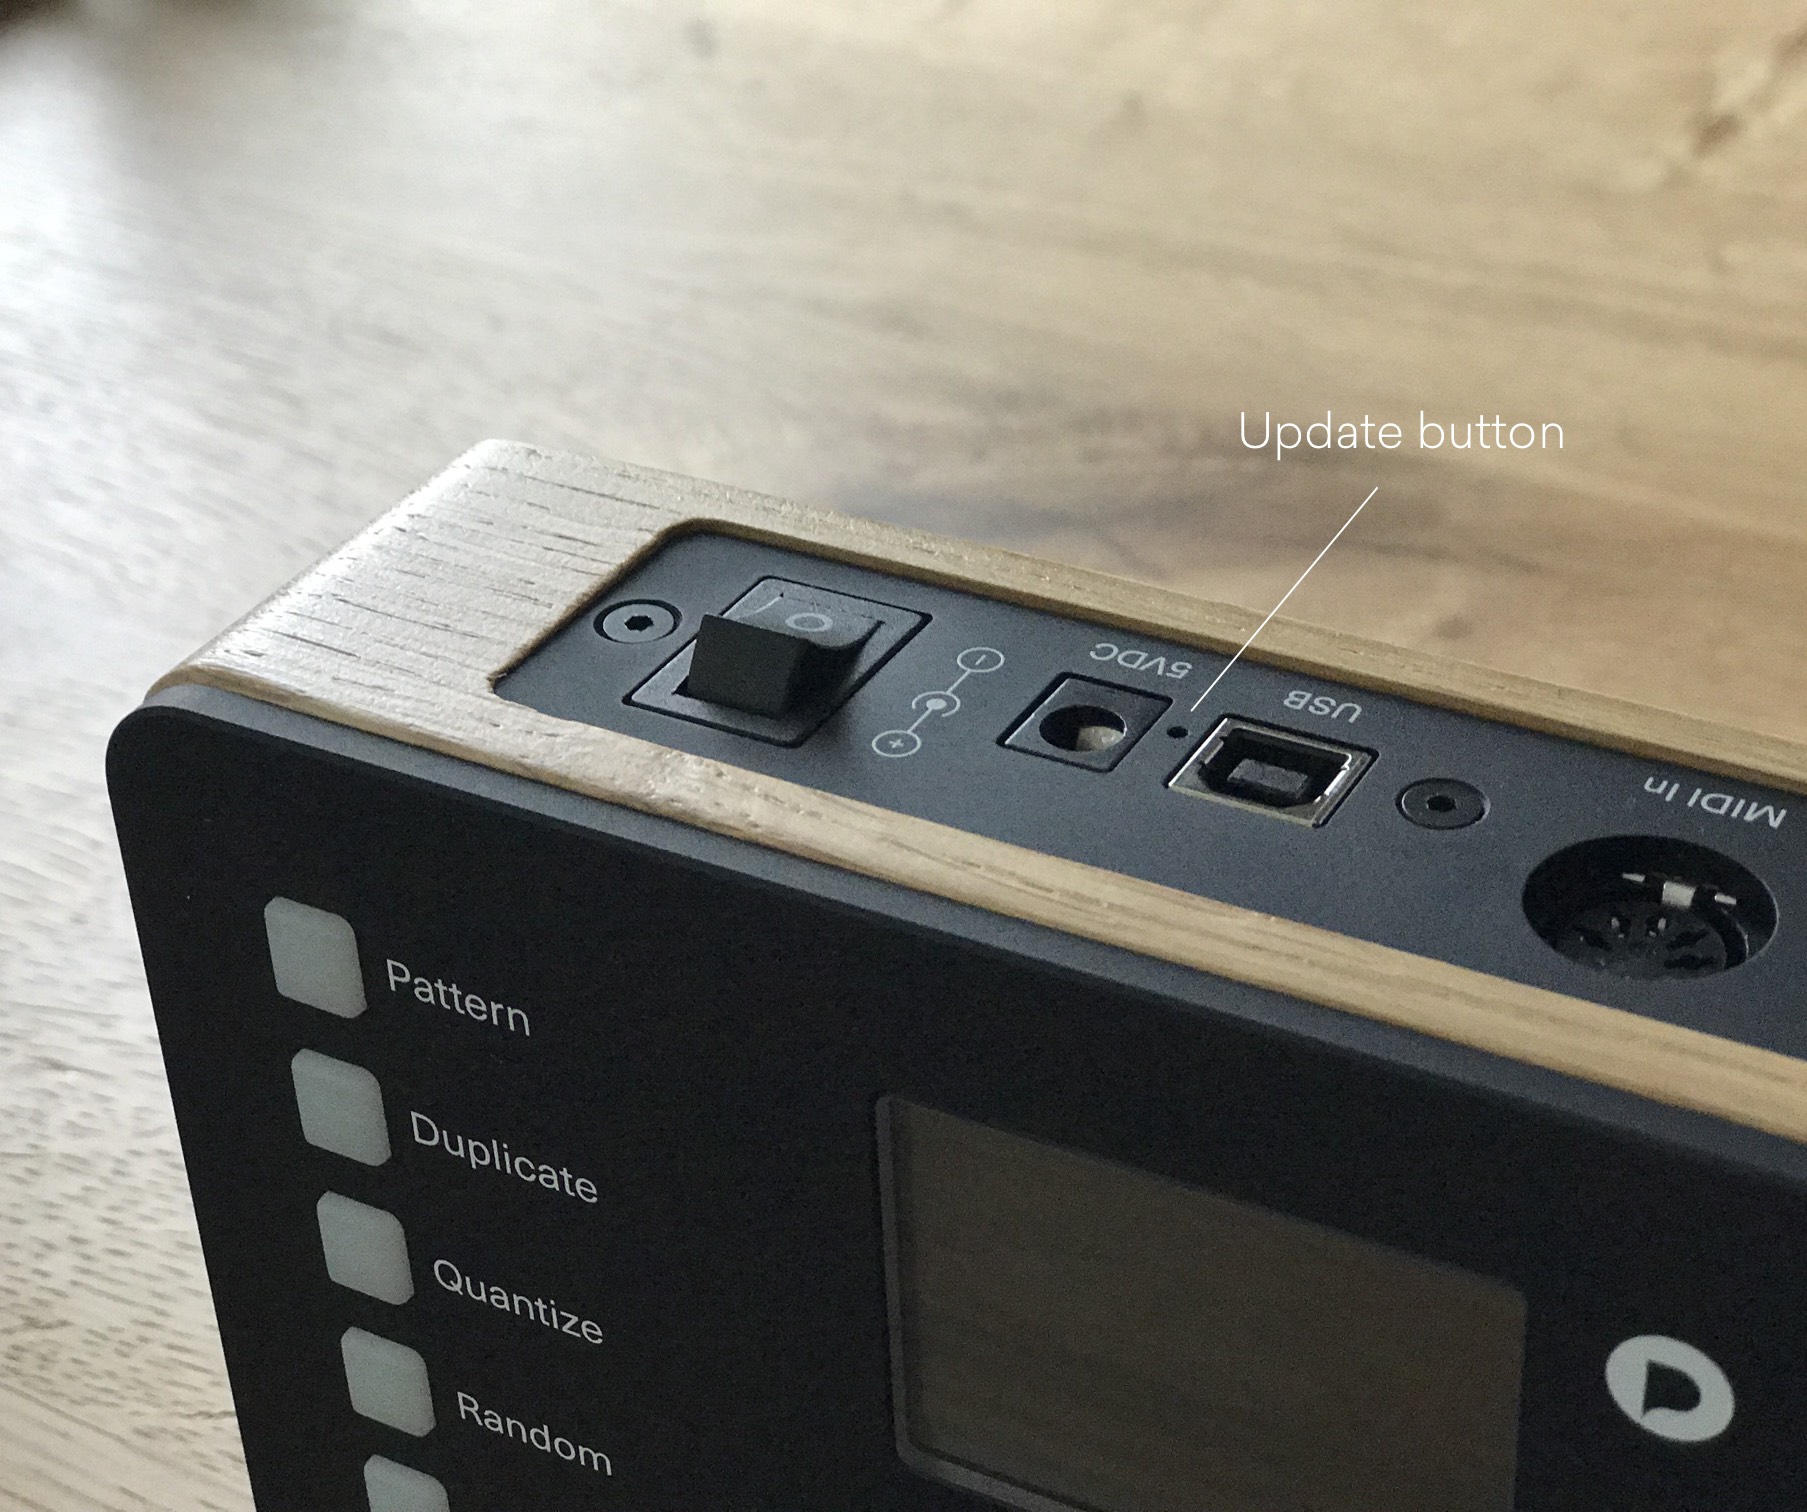
- Hidden firmware update button, which functions in use is explained in a section named Firmware update procedure below.
- The 5VDC power connector socket.
- And last but not least, the power switch.
Front panel
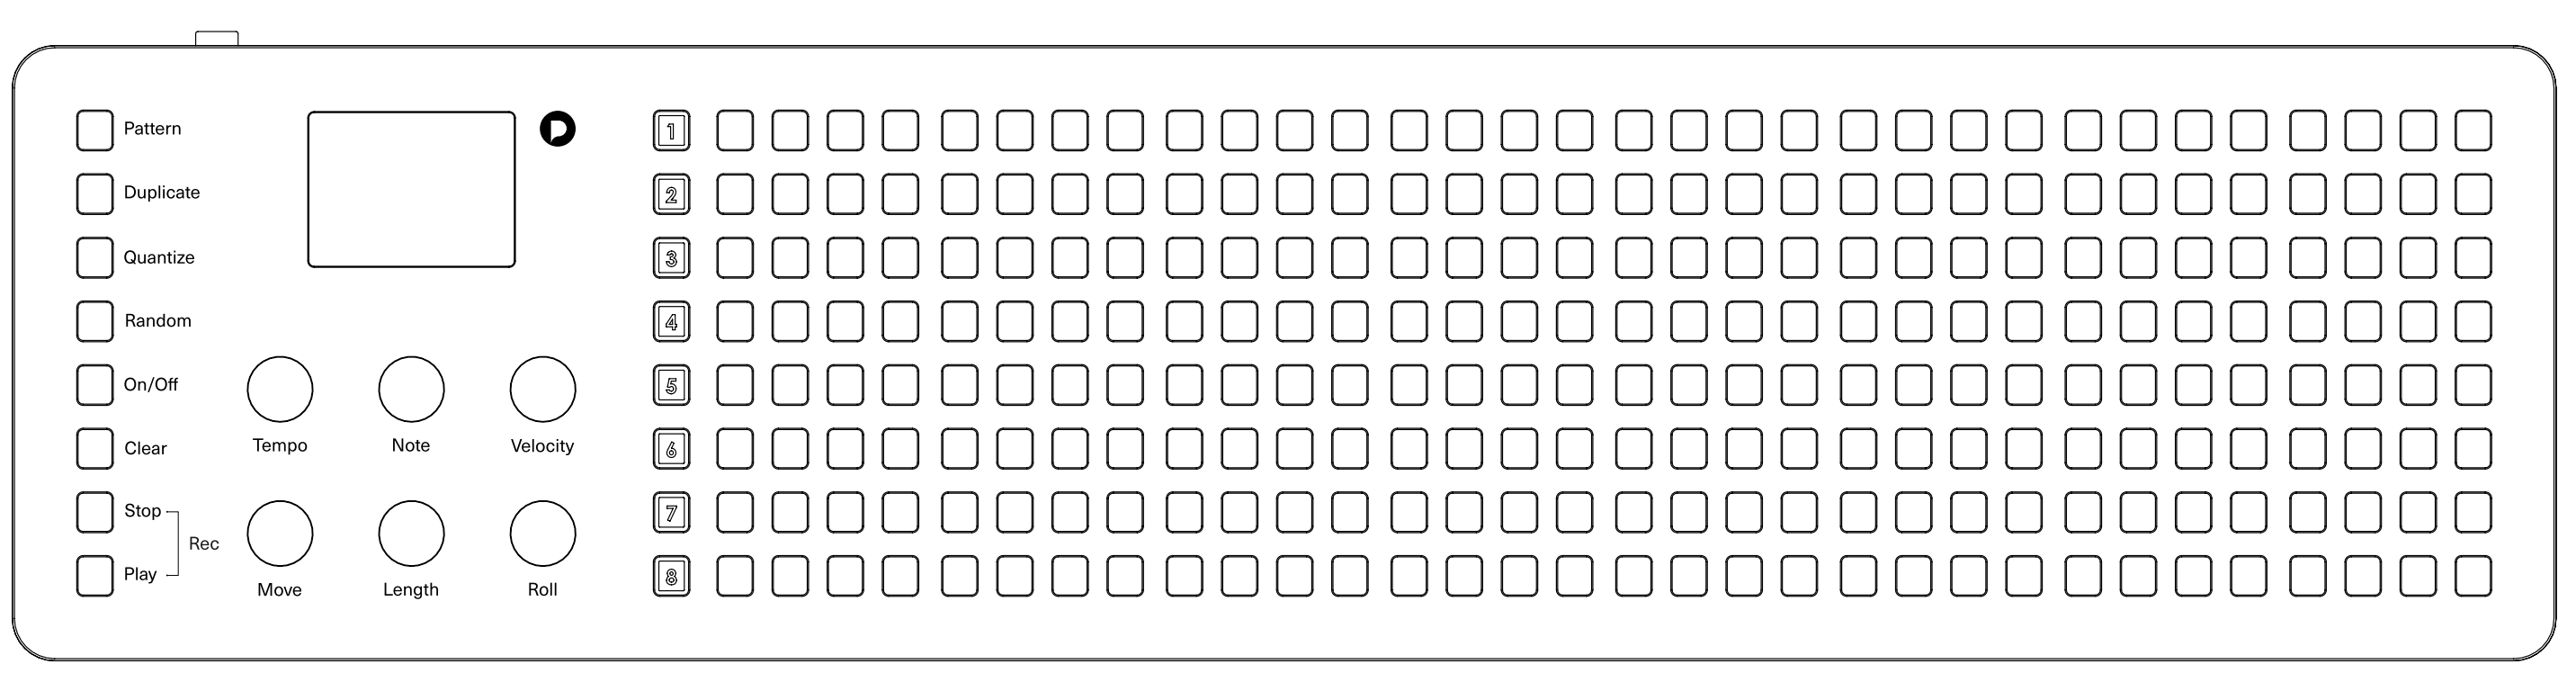
When looking at Seq’s front panel from left to right:
- 8 function keys: Pattern, Duplicate, Quantize, Random, On/Off, Clear, Stop, Play.
- A 4 Line TFT Display with no sub-menus.
- 6 Clickable infinite Knobs.
- 8 “Track” buttons numbered “1” through “8”.
- 8 Rows of 32 Steps per Track buttons.
The four-line display with just one menu level, six clickable knobs, and eight-track buttons. Then right after them, the corresponding eight rows of 32 step buttons which taken together are also storing its 256 preset patterns (which can be linked, this allows creating really long and complex sequences, read more about it below). Every track can be recorded step by step or in real time and then quantized independently. To make the workflow easier we’ve implemented a mechanism that remembers the last setting given for parameters like for example the note, chord, scale, velocity and modulation values or nudges for few seconds.
Function buttons
One of the best things about the Seq is that anyone with prior experience with a music sequencer will be able to begin using Seq without reading this manual or knowing exactly what most of its functions are for. It was designed to be intuitively labeled and understandable enough to start the fun right away. Pressing a button will turn a step on and off. Keep the step button pressed for a while it will show its current parameters and it will allow you to change them. All changes can be applied at any time, with or without the sequencer currently running on. Let’s Begin!
Pattern button: Store and recall patterns by pressing the Pattern button followed by a step button. For example, pressing the first button in track one calls up patterns 1-1, and its number is displayed on the screen. Patterns cannot be renamed. We’ve found it a nice habit to have to back up favorite patterns (by simply duplicating them into other patterns).
Duplicate button: Use this function to copy the steps, patterns, and tracks. Copy a track with its all parameters like root note, chords, scale, track length, playback type, and so on to another one. We find it inspiring to duplicate and modify the various aspects of the separate track, such as its length and playback direction to create interesting patterns. Copy patterns by using the Duplicate function with the Pattern buttons. Just select the source pattern and then press the destination where it should be copied to.
Quantize button: The steps entered manually on the Seq grid are quantized by default (unless the step Nudge function discussed below is used). However, a sequence recorded from an external controller to a chosen track will consist of those notes with all the micro-moves and velocity – “human touch” in other words. To quantize them just hold the Quantize button together with a track button and voila, it’s done. Quantization will override any nudged steps in the sequences.
Random button: Hold it down together with a track number button to immediately populate a sequence with randomly generated data. The randomization will follow in the chosen musical scale and root note and will create unique sequences on the fly. Using the Random button will also apply changes to rolls, velocity, modulation, and humanization (nudge) parameters (more below in the knobs section). Adjust the number of triggered notes of a roll inside a step by holding down the step button and pressing and turning the Roll knob.
On/Off button: Use it to simply turn any of the tracks on and off while the sequencer is running. Press On/Off, then sweep finger down from the top to the bottom of the column of track buttons, this will turn off the ones that are on, and turn on the ones that were turned off at the when moment a finger goes over them. When a track button is lit, that means it will play the contained sequence.
Clear button: Instantly erase the contents of a track by using Clear and the track number buttons pressed together. Use it with the Pattern button to clear chosen patterns really fast.
Stop, Play & Rec buttons: Both Stop and Play are pretty self-explanatory but each press of the Play button after the first one will reset the play points of all eight tracks. Holding down Stop, then Play, will commence a 4-beat punch-in displayed by step lights on the grid. Achieve the same effect using the footswitch pedal. Record MIDI data from an external controller. Remember that Seq will always start recording from the top or highest turned on track. Recording won’t overdub the notes existing on the track already but may alter them. So it may be a good idea to turn off the tracks with already existing data or change their incoming MIDI channels in order to keep the sequences unchanged. Seq will only record notes on tracks that are turned on. Once a sequence is recorded into Seq in this way, use the Quantize button to snap notes to the grid and make them more rhythmical, just as explained above.
Worth mentioning that there is no metronome in Seq as such. Yet, if a metronome is needed to catch good timing while recording sequences, just set some rhythmical steps on track number eight (because of the reason explained above), and send them to any sound source. It will behave exactly as a metronome then!
Knobs
The Seq knobs are convenient clickable encoders. Their step range is based on a sophisticated algorithm that was implemented to improve the workflow. They are precise when turned them gently, but will speed up when twisted a bit faster. By pushing them down – choose from options displayed on the screen, and then by rotate to change parameter values. Use the knobs to access most of the editing features which can be performed on individual steps as well as full tracks (this allows subtle or radical altering of the sequences while they play). Most of the knobs are responsible for individual track and step parameters, and change their options while one of them is pressed.
Tempo knob
The Tempo knob has a global impact and corresponds to each pattern’s settings. It can also be used with the track buttons in order to set their advanced MIDI and clock settings. Its functions are as follows:
Global parameters:
- Tempo: Adjusts the pace of each pattern, every half unit from 10 to 400 BPM.
- Swing: Adds that groove feeling, ranging from 25 to 75%.
- Clock: Choose from internal, locked or external clock over USB and MIDI connection. The Seq clock is a 48 PPQN MIDI standard. Enable Tempo Lock function which locks the tempo of current pattern for all patterns stored in memory. This might be really helpful for live performances and improvisations.
- Pattern: Displays the two-digit number (row-column) which points out which pattern is currently edited.
Track parameters:
- Tempo div: Choose a different tempo multiplier or divider per track on 1/4, 1/3, 1/2, 1/1, 2/1, 3/1, 4/1.
- Channel in: Sets MIDI input communication port to All, or from 1 to 16.
- Channel out: Sets MIDI output communication port from channels 1 to 16. Each track can operate on the different MIDI channel.
- MIDI Out: Set the desired track output port with or without MIDI Clock output. With the following options: Out1, Out2, USB, Out1+Clk, Out2+Clk, USB+Clk.
Note knob
Press down the Note knob together with any of the track/step buttons, preview what sound/note/chord it holds. Seq’s grid isn’t really made to be played like a keyboard, but this way allows to playback chords and steps that already exist in the sequences.
Track parameters:
- Root Note: Allows to set Track and Scale root note from in between ten octaves, from -C2 to C8.
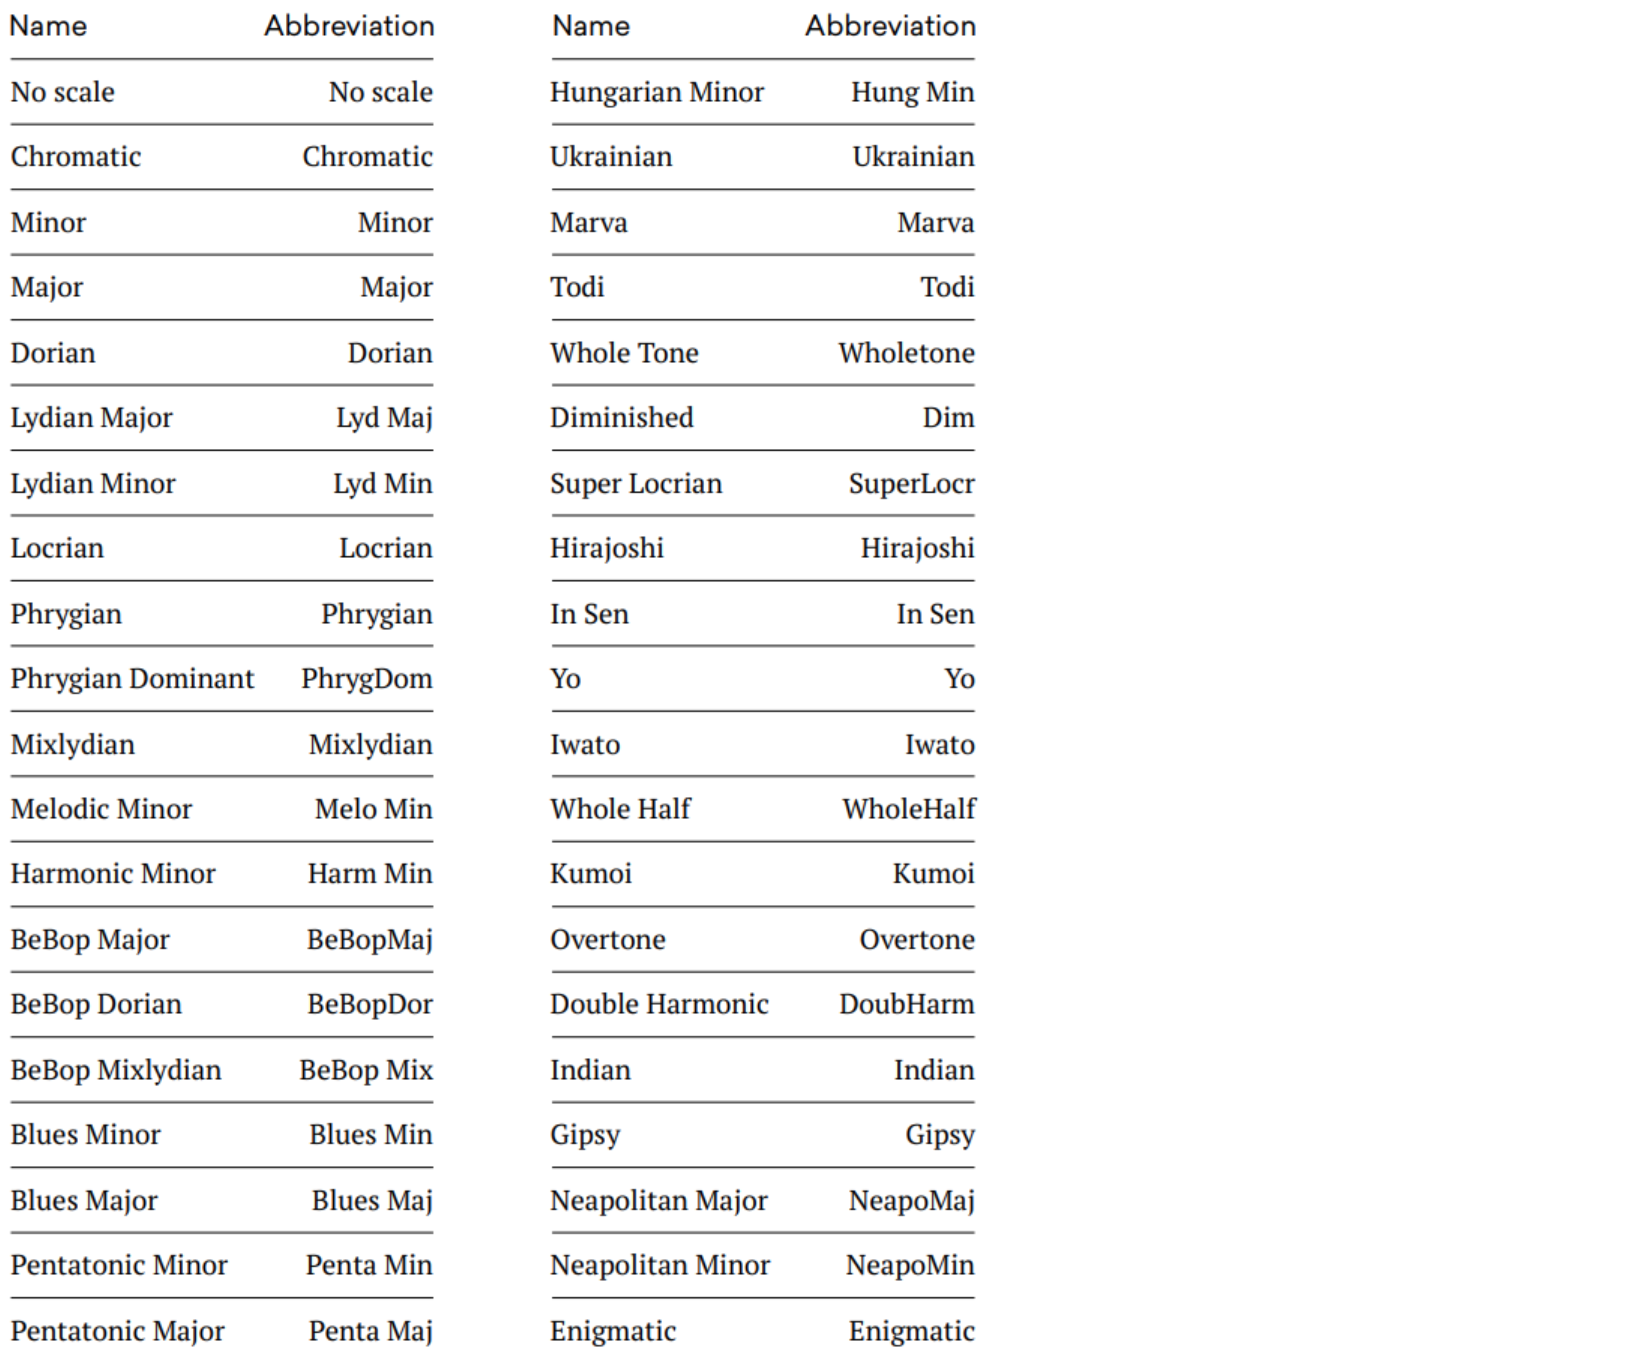
- Scale: Assigns a specific music scale to a track based on any root note selected. Choose from 39 predefined musical scales (see the scales chart). When tuning individual steps, the note choices are confined to the chosen scale. Notice that using a scale on an existing sequence will quantize all of its notes and notes in chords to that particular musical scale, this means that while changing the track’s root note, the note in each step is transposed by the same amount. For example, while working with a D3 root using the Blues Major scale, changing the root to, say, C3, transposes all the notes down a whole step. That way chords and melodies will remain harmonically “glued” together.
Step parameters:
- Note: Choose the desired note for the currently edited single-step. When a scale is applied to a certain track, it’s possible to choose notes from inside the used music scale only.
- Chord: Gives access to a list of 29 (see the chord chart in appendix) predefined chords which are available per step. The predefined chords per step were implemented because when one is recording chords into Seq from an external MIDI controller, they are consuming as many tracks as the chord consists of notes. If the predefined chords that we’ve implemented to be available per step are too limited, please remember that it’s possible to set another track playing on the same instrument and add single notes in the steps corresponding to the first track’s chords and make own ones. If adding notes to chords still seems a limited option, try to add whole another chord.
- Transpose: Changes the pitch of a step by a constant interval.
- Link to: This is a powerful tool which allows chaining to the next pattern or between any available patterns. Put a link in any step on the desired track, when the sequence reaches that point, changes the entire sequencer to a new Pattern. Link a pattern to itself and achieve a short pattern repetition this way. For example, program it so that when a sequence will reach Track’s 1, Step 8 Seq will jump to a new pattern—say, 1-2. Just set half of the tracks off, the pattern won’t change as the sequence passes step 8. This feature is really easy to program and lets nest sudden pattern changes, or plug them in on-the-fly. Link restarts the sequence and plays it from the first step. The link also disables note/chord and vice versa.
Try experimenting with setting different tempo signatures for linked patterns to speed up or slow down a half, this can bring some really cool sound changes in the arrangements!
Velocity knob
The Velocity knob allows to set up velocity levels for each separate step or the whole track at once. One can also opt to have velocity chosen randomly for a track while using the Random button. Choose which CC is assigned to which track, and also set the modulation level to Random. Set one CC communication per track and it’s value per step. But in case if that’s not enough, and there’s a need to send more CC modulations on one track and one step (for example when a note is longer than one step, and there’s a need to CC modulate it’s “tail”) use another track, and place steps with different CC modulation communicate and velocity set to 0. This opens many more possibilities in case of Seq hardware limitations. But hey, aren’t a few limitations something we really dig in hardware devices?
Track parameters:
- Velocity: Sets the percentage of distinction for all steps on the selected track, in a classic MIDI scale from 0 to 127.
- Random Vel: Determines if the Random button affects velocity changes for the chosen track.
- CC number: Sets desired CC parameter for modulation on the desired track.
- Random Mod: Dictates whether or not the Random button is influencing CC parameter modulation on a selected track.
Step parameters:
- Velocity: Sets the percentage of distinction for a single selected step.
- Modulation: Is responsible for turning on and setting the intensity of CC parameter modulation. From No position, where it’s totally turned off, which was necessary for some types of synthesizers to 127.
Move knob
The Move knob gives the ability to move a whole existing sequence back and forth. Do the same for every single note. Just press the track button or the desired step button and twist the knob left or right to change their positions. Oh, there’s also a cool performance-oriented feature – click and hold down the Move knob then indicate the step/s on a track/s to trigger.
Track parameters:
- Move: Allows to swipe a whole sequence of notes existing on a track at once.
- Nudge: Is responsible for gentle micromoves of all notes contained on the selected track. Nudge disables roll and vice versa
- Humanize: Allows to choose if Random button is adding Nudge micro-moves for notes in randomized track sequence.
Step parameters:
- Move: Allows to swipe a single chosen step in a sequence.
- Nudge: Will gently move the currently edited step. The internal per step nudge resolution is 48 PPQN. The nudge is working to the “right” side of the original note placement, there’s no option to nudge the note to the “left” side in Seq.
Length knob
The Length knob can help with creating polymetric and polyrhythmic sequences on the fly. To quickly change the number of steps in a chosen track press that particular track button and turn the Length knob or push down the Length knob and choose the track length on the grid, whichever is prefered. The step lights in that track will indicate, from left to right, how many steps is currently worked on. Use Length to select the Play Mode or to set the Gate length too.
Track parameters:
- Length: Sets the track length from 1 to 32 steps.
- Play mode: Can breathe a new life into already funky sequences. Choose from Forward, Backward, Pingpong and Random playback modes.
- Gate mode: Set gate time for all notes in the sequence (5%-100%).
Step parameters:
- Length: Edits the time span for single edited step (displayed on a grid as step tail).
While working with polymetric drum tracks, especially when changing the lengths of separate tracks on the fly, notice that a sequence as a “whole” made out of 8 separate tracks will get “out of sync”. And even when the pattern is changed to another, the “play points” of separate track sequences won’t reset, something that might look like the tracks went out of sync. It was programmed in this particular way on purpose and is explained in a detailed manner below in the “Few other words section”.
Roll knob
Rolls are being applied to the whole note length. Holding down a tracking number then pressing and turning Roll will gradually fill the track with notes. This can be very useful in creating dance-oriented drum tracks on the fly. Holding down a step button while pressing Roll gives an option for the number of repeats and the volume curve. Seq rolls are fast and tight and velocity curve configurable. The most convenient way of deleting an existing roll value on a step is to turn that particular step off and back on.
Track parameters:
- Roll: When applied to a track, Roll adds steps with an assignable interval between them. Roll disables nudge and vice versa.
Step parameters:
- Roll: Sets divider on 1/2, 1/3, 1/4, 1/6, 1/8, 1/12, 1/16.
- Velo Curve: Chooses velocity roll type from: Flat, Increasing, Decreasing, Increasing-Decreasing, and Decreasing-Increasing, Random.
- Note Curve: Pick a note pitch roll type from: Flat, Increasing, Decreasing, Increasing-Decreasing, and Decreasing-Increasing, Random.
External controllers
Seq is capable of receiving and recording notes (including note length and velocity) from various external controllers. To record incoming communications, simply connect the external gear via MIDI or USB port, highlight one or more tracks to record on, hold down the Stop and Play buttons together to start recording. Then proceed with playing the external gear. Please remember that as we’ve mentioned above, Seq is by default recording incoming notes starting from the top rows of tracks. Also, note that recording, for example, a three-note chord will consume three tracks. We know it’s a lot, that’s why we’ve decided to implement predefined chords which can be placed on one track.
Record notes from an external controller directly into a step. Just hold down the desired step on Seq grid and send the note. The same rule applies to chords, just hold steps on a few tracks at the same time.
There’s also one more cool trick that can be performed! Hold one or more track buttons and send a MIDI note from external gear to change the root key of an existing sequence of notes. Do this “on the fly”, there’s no need for stopping playback. The interesting fact of using this is that it turns Seq into kind of a polyphonic arpeggiator, as one can change the root notes for the separate tracks while they’re on the run!
MIDI implementation
Seq sends out the standard MIDI communicates including transport, ten octaves of notes from -C2 to C8 with velocity and CC signals from 1 to 127 with modulation parameter. Seq will receive transport when it is set to an external source as well as notes with nudges and their velocity. Swing parameter is not accessible while Seq works on the external MIDI clock, in this setting, Seq won’t send or receive swing from external gear. There is no MIDI soft thru implemented.
The MIDI over USB is fully class-compliant. The Seq USB micro-controller is full-/low-speed On-the-Go controller with the on-chip transceiver. It is working in 12 Mbit/s Full Speed 2.0 and has 480 Mbit/s (High Speed) specification. And is fully compatible with the low-speed USB controllers.
There is no way to dump MIDI as such data from the Seq unit, but one can always easily record all the sequences into any DAW of choice.
Meet Poly
Initially, when we started works on early Seq designing, we planned a full set of 8 CV channels of four outputs of the gate, pitch, velocity, and modulation located on the back panel. At the same time, we realized we wanted Seq to have a sturdy hand-crafted wooden chassis. After we prototyped the unit we came to the conclusion that the beautiful oak texture looks strange with all these little holes in it. So we decided to take out all the CV outputs from the Seq housing and made a separate instrument out of it.
What came out of that idea grew up beyond our expectations and became a standalone product called Poly and later on Poly 2. Poly is a Polyphonic MIDI to CV Converter in the Eurorack module form. Call it a breakout module, a new standard in connectivity which supports MPE (MIDI Polyphonic Expression). Poly and Seq are an ideal couple. They supplement and complete each other, but also make out just great on their own.
The Poly 2 module is offering a vast array of inputs and outputs and provides the user with the freedom to connect all sorts of sequencers, digital audio workstations, keyboards, controllers, laptops, tablets, mobile apps and more! The only limit here is imagination. The inputs available inputs are MIDI DIN, host USB type A, and USB B. All three of them can be used at the same time. Poly opens the modular world to a digital world of MIDI and can do magic together with Seq and all the music gear. Depending on what is planned to achieve, there are three modes which can be chosen from: Mono First, Next, Channel and Notes.
Remember that the Seq can be the heart of a sophisticated hardware rig, but will also do great with a favorite DAW. It’s even possible power-up Seq from a tablet or a smartphone using one of many available adapters!
Few other words
There are a few more things worth mentioning about our product. For example, Seq autosaves every slight change made to the sequences and patterns. Implementing an “undo” function would have been very complex. Since we wanted to keep things simple, we’ve decided not to add an undo function. This solution, like everything else, has it’s pros and cons but we much prefer this workflow. So many times while working with other sequencers we’ve forgotten to save our sequences before switching to the next one and lost them -Seq works in just the opposite way.
Also, we’ve opted to simply name the Patterns with numbers because we wanted this to be simple. Naming the patterns from a knob, letter by letter gives us shivers.
After spending some time with Seq, especially while playing with different track lengths and polyrhythms, one will surely notice the unusual “reset behaviour”. Something that might look like the tracks went out of sync. It was programmed in this particular way on purpose, and it’s not a bug. Even if we like to program dance-oriented 4×4 tracks from time to time, we’ve also tried to keep in mind other music genres too. We love improvised, ambient, and experimental genres where this function of Seq is really useful. We’re so up to the eyes with a music world dominated by DAW’s and strict grid sequencing, where everything is perfectly synced up to the bar/grid and always in time, that we wanted to free ourselves up from that. This is the purpose of why Seq works like that. That also gives a unique option to achieve a nice “human touch” effect when jamming with the patterns. Another thing is that Seq changes the patterns exactly when a new pattern button is pressed, patterns don’t change at the end of a phrase. I guess it’s just a matter of getting used to it. Yet, it’s possible to restart the play points by pressing the play button while the Seq is already running. Use the Link to function anytime on the fly, and then the track sequences will get restarted and play straight from the beginning.
To program “acid” bassline and would be looking to make slides or pitch bends. Legato is usually a function of a synthesizer, not necessarily a sequencer. Achieve it easily by using more than one track in Seq for the same controlled instrument. So here again we have a hardware limitation that can be easily overcome by some not so usual approach.
Important – Make sure that the original AC adapter is used only! It’s possible to power the Seq it up both from the USB port and the original AC adapter. Mark the power plug of the AC adapter because the Seq is operating at 5v and is very sensitive for the higher voltages. It’s easy to damage it with the use of an improper AC adapter with a higher voltage!
Firmware updates
If possible from the software implementation level, Polyend will fix any firmware related issues considered as bugs. Polyend is always keen on hearing user feedback about possible functionality improvements but is not anyhow obligated to bringing such requests to life. We appreciate all the opinions, a lot, but cannot guarantee or promise their appliance. Please respect that.
Please make sure that the newest firmware version installed. We are doing our best to keep our products updated and maintained, that’s why from time to time we post firmware updates. The firmware update won’t affect patterns and data stored in Seq. To commence the procedure, something thin and long like an unbent paperclip, for example, will be needed. Use it to press a hidden button which is located on the Seq back panel to allow Polyend Tool app to flash the firmware. It’s located about 10mm below the back panel surface and will “click” when pressed.
In order to update the firmware, download the right Polyend Tool version for the used operating system from polyend.com and proceed as asked by the application.
Polyend Tool also allows to dump all the patterns into a single file and loading such backup back to the Seq anytime.
Important – when flashing, connect the Seq to the computer using the USB cable only, with AC adapter disconnected! Otherwise, it the Seq will get bricked. If this happens, just reflash the bricked Seq on the USB power only.
Warranty
Polyend warrants this product, to the original owner, to be free of defects in materials or construction for one year from the date of purchase. Proof of purchase is necessary when a warranty claim is processed. Malfunctions resulting from improper power supply voltages, abuse of the product or any other causes determined by Polyend to be the fault of the user won’t get covered by this warranty (standard services rates will be applied). All defective products will be replaced or repaired at the discretion of Polyend. Products must be returned directly to Polyend with the customer paying the shipping cost. Polyend implies and accepts no responsibility for harm to a person or apparatus through the operation of this product.
Please go to polyend.com/help in order to start a return to manufacturer authorization, or for any other related inquiries.
Important Safety and Maintenance instructions:
- Avoid exposing the unit to water, rain, moisture. Avoid placing it in direct sunlight or high-temperature sources for a long time.
- Do not use aggressive cleaners on the casing or on the LCD screen. Get rid of dust, dirt and fingerprints using a soft, dry cloth. Disconnect all cables while cleaning. Only reconnect them when the product is totally dry.
- To avoid scratches or damage, never use sharp objects on the body or screen of the Seq. Do not apply any pressure to display.
- Unplug your instrument from the power sources during lightning storms or when it is not used for long periods of time.
- Make sure that the power cord is safe from harm.
- Do not open up the instrument chassis. It is not user repairable. Leave all servicing to qualified service technicians. Servicing may be required when the unit has been damaged in any way – liquid has been spilt or objects have fallen into the unit, has been dropped or does not operate normally.
Endnote
Thank you for taking your precious time to read this manual. We’re pretty sure that you knew most of this before you’ve even started reading it. As we’ve mentioned before, we’re always into improving our products, we’re open-minded, and always into hearing about other people ideas. There’s a lot of interesting requests out there about what Seq should and should not do, but it doesn’t necessarily mean that we’re into implementing them all of them. The market is rich in feature-loaded hardware and software sequencers that can outshine our Seq with many exotic functions. Yet, it doesn’t really make us feel like we should follow this path or copy existing solutions into our product. Please keep in mind that our main goal was to make an inspiring and simple instrument with what you see is what you get interface, and we want it to stay that way.
Sincerely yours
Polyend Team
Appendix
Technical specifications
- Seq body dimensions are: width 5.7″(14.5cm),height 1.7″(4.3cm), length 23.6″(60cm),weight 4.6 lbs (2.1kg).
- The original power adapter specification is 100-240VAC, 50/60Hz with interchangeable heads for North/Central America & Japan, China, Europe, UK, Australia & New Zealand. The unit has a + value in the middle bolt and – value on the side.
- The box contains 1x Seq, 1x USB cable, 1x Universal power supply and printed manual
Music scales
Chord names

Download
Seq MIDI Step Sequencer manual in PDF form.